
Car and Fluid Simulation
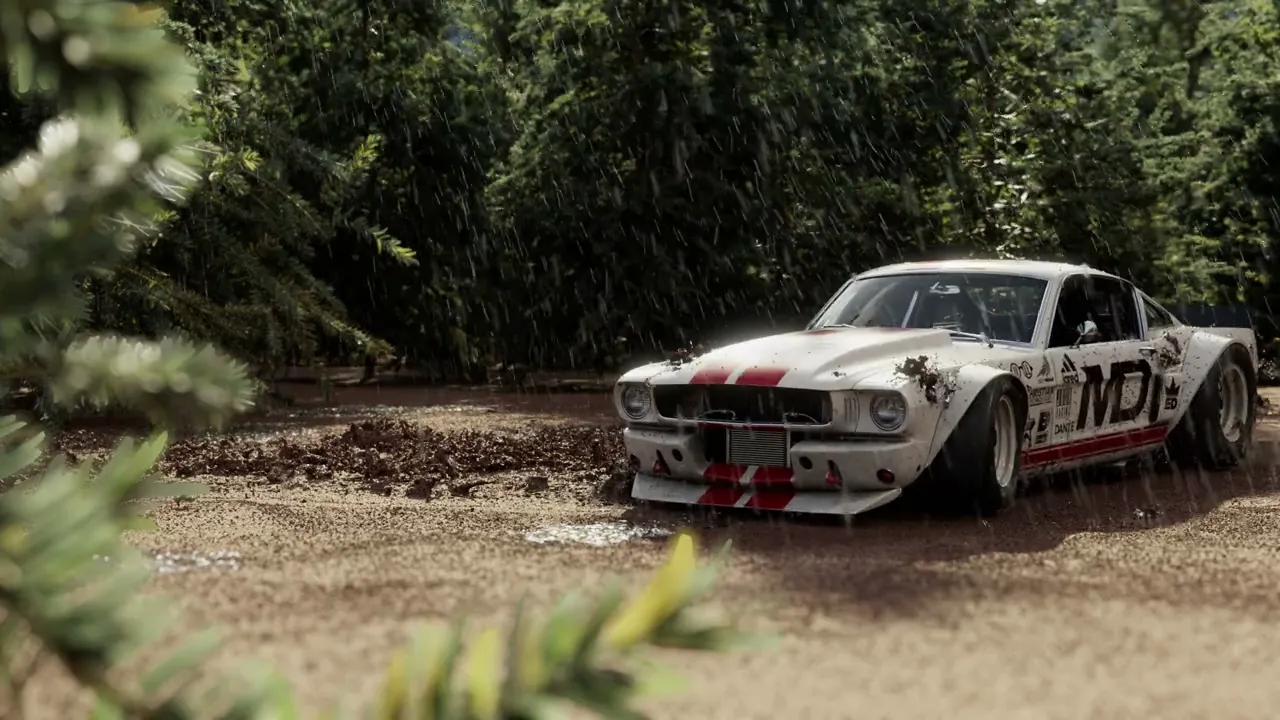
'27 Mudstang
A car sits frozen in old project files, waiting. Your job? Bring it back to life, but in Houdini. As the studio's newest artist, you'll resurrect this vehicle making it drift, spin, and shine in ways that'll make the client forget the old project ever existed.
Year
2025
Tools
Houdini, Nuke, Illustrator
Credits
Scroll to Explore
Car and Fluid Simulation
'27 Mudstang
A car sits frozen in old project files, waiting. Your job? Bring it back to life, but in Houdini. As the studio's newest artist, you'll resurrect this vehicle making it drift, spin, and shine in ways that'll make the client forget the old project ever existed.
Year
2025
Tools
Houdini, Nuke, Illustrator
Credits
Scroll to Explore
the final
the final
the frames


the study
OVERVIEW
the brief
Create a short, pitch-ready moment to learn procedural VFX in Houdini, Solaris, and Karma. The inherited assets and simulation tools serve as the foundation for developing a polished, atmospheric animation that showcases look development, rigging, animation, lighting, and compositing in a streamlined VFX workflow. The goal is to produce a style-frame-driven shot that feels like a concise, high-end concept pitch for a client.
INTAKE
importing, on steroids
The extremely detailed model and textures were acquired from Wire Wheels Club (you should check them out!) and the technical artist Christian Huthmacher provided several Houdini tools. Using both of these as a starting point, it eased the steep learning curve that is my first time in Houdini.
When importing the car model it was important to the process to deconstruct the original FBX files and recreate them in Houdini as a USD file. USD allows for variants featuring multiple color-ways and versions of the car to be packaged down into a single file.
More importantly, to ensure the texturing process ran smoothly, I created consistent naming conventions and file structures. If one thing somewhere in the file is named wrong, or a file path is incorrect, Houdini starts to become Hou-dinki.
Import Tool

Missing texture pink <3
Flawless UV unwrap

in houdini, texturing isn't magic
Houdini is notoriously a different kind of magic. It is up to the user to define how its world works. Even though I knew this, I thought texturing would be familiar and friendly, turns out, not so much.
In order to be used in Houdini, the textures needed to be rebuilt in Karma from the ground up. The rigid file naming conventions helped make this process as efficient as possible. Textures then use the ‘context’ of their names to understand what part of the car they belong to.
Populating textures by individual geometry groups
Base variants
Texture 1/30!

a ringling homage
Chasing that rally-car aesthetic, I wanted to sticker bomb the car with sponsors. Who better than the professors 'sponsoring' my career? Everyone has an iconic quirk that is uniquely theirs, so I used my professor's and created logos for each of them in Adobe Illustrator.
To kick off the re-texturing process I brought the car into Adobe Substance painter. This allowed me to create selections in 3D space to easily modify the 2D unwrapped texture of the car in Photoshop. The other major benefit is that I could live preview the changes to the 3D model.
After creating the stickers in illustrator. The live preview allowed me to tweak the sticker placement in Substance as I applied the stickers to the texture in Photoshop.
// Hero Texture
THE RIG
drive it like you stole it
In the true fashion of starting a new software, I didn't do anything familiar or safe. Houdini recently released a new car rig, and who would I be if I ignored that for my car-centric project.
Step one: Give it some wheels
The car rig accurately simulates the physics, but requires the model to be rigged. With this tool, I only had to rig the tires and how they connect to the car, then Houdini simulated the rest of the car.
Step two: Remember how to drive a car
Animating here felt a bit unnatural at first as it isn't like 'traditionally' animating in C4D. Instead of key framing the position of the car, you drive the car. You tell the sim when to press the gas, push the brakes, and when to turn the wheel.
Step three: Drive it like you stole it
First, watch five videos on how to drift a car. Second, put your hands out in front of you and imagine steering a car. Then use that imaginary scenario to drive the car's parameters and keep iterating until you get a dramatic looking drift.
Sims are all about trial and error
Car drivetrain for the rig

Fully rigged and controlled
I am a great driver I promise
// Animation Pass
WORLDBUILDING
and then I started blastin'
Using the USD variant system from earlier, I created a single file that contained multiple types of trees. I set up a quick scatter node that took those variants and scattered them randomly across the ground. To avoid crashing and burning, a 'track' for the car had to be carved out of the trees.
In comes the coolest thing I have used in Houdini so far: The blast node. It's simple at its core, but powerful in application, it can alter points or 3D geometry from anything. Have a sim that took 5 hours to cache and render but there are a few particles blocking your view? Blast those particles away! No need to re-render the entire shot.
Multiple trees, one USD file

Removing trees using Blast node
THE MUD SIM
playing in the mud
Inspired by Rallycross motorsports, I knew early I wanted to drown the car in mud. Using an MPM solver in Houdini and mud sim tools provided by Christian, I wouldn't be afraid to get a little dirty.
One of the most important things I have learned as a 3D artist is that it is important to be efficient and optimized.
Trudging into the mud sim, the first step towards optimization is to find the bounding areas of the entire animation. To do this, I visualized the full path the car drove. I can cut the paths overall shape into the ground, filling it with mud. The goal is to ensure there is only mud where the car is driving so there is no wasted overhead.
Christian, the technical artist, has come in to save the day again by providing the mud solver. This solver is the fluid sim that drives the mud and water spray. I come in as the art director essentially to modify the parameters that control the mud.
Once the textures were finished, I ran the mud sim to view the final product, then re-ran both the driving and mud sims to curate the best shot.
Multiple sim layers of Mud and Water
Extremely in depth mud and fluid solver
FIX IT IN POST
nuke for first timers
Keeping up with the trend of trying new things in this project, I rendered out my entire animation with several AOV passes baked in. These AOVs contain information invisible to the eye, but contain vital data like depth, geometry groups, and lighting information. Using these AOV passes in Nuke enabled me to alter and edit entire parts of the final render without needing to re-render.
There were two things I wanted to accomplish in Nuke with this project. First was to control depth in post, providing more flexibility than rendering it in engine. Second was to explore cryptomattes to add 'in-world' text that the car could drive through. Unfortunately due to the nature of the sim, my cryptomattes render corrupted, showcasing one of many quirks in software as dense as these.
Simple FX applied in Nuke

Depth pass focus range

Cryptomatte objects pass

Color grading and effets applied in Nuke
SO WHAT?
the takeaway
The Mudstang got me through the initial confusion that Houdini casts and opened my eyes to it. Being thrown into this mock studio and pipeline allowed the strengths of Houdini to really shine. I got to play multiple parts in the entire production pipeline and see how involved, yet versatile each step is. I started in the role of someone who processes all the incoming files and preps them to be used in-engine. Then the role of an animator, where I passed the animation along to VFX. As a VFX artist I built the sims and understood the faults in the animation the required a second pass.
Houdini is extremely involved and overwhelming, but the pieces really started to click after I got through the growing pains. It is extremely rewarding to see each pass of my project come together and build upon one another.


Car and Fluid Simulation
'27 Mudstang
A car sits frozen in old project files, waiting. Your job? Bring it back to life, but in Houdini. As the studio's newest artist, you'll resurrect this vehicle making it drift, spin, and shine in ways that'll make the client forget the old project ever existed.
Year
2025
Tools
Houdini, Nuke, Illustrator
Credits
Scroll to Explore
the final
the frames
the study
OVERVIEW
the brief
Create a short, pitch-ready moment to learn procedural VFX in Houdini, Solaris, and Karma. The inherited assets and simulation tools serve as the foundation for developing a polished, atmospheric animation that showcases look development, rigging, animation, lighting, and compositing in a streamlined VFX workflow. The goal is to produce a style-frame-driven shot that feels like a concise, high-end concept pitch for a client.
INTAKE
importing, on steroids
The extremely detailed model and textures were acquired from Wire Wheels Club (you should check them out!) and the technical artist Christian Huthmacher provided several Houdini tools. Using both of these as a starting point, it eased the steep learning curve that is my first time in Houdini.
When importing the car model it was important to the process to deconstruct the original FBX files and recreate them in Houdini as a USD file. USD allows for variants featuring multiple color-ways and versions of the car to be packaged down into a single file.
More importantly, to ensure the texturing process ran smoothly, I created consistent naming conventions and file structures. If one thing somewhere in the file is named wrong, or a file path is incorrect, Houdini starts to become Hou-dinki.
Import Tool
Missing texture pink <3
Flawless UV unwrap
in houdini, texturing isn't magic
Houdini is notoriously a different kind of magic. It is up to the user to define how its world works. Even though I knew this, I thought texturing would be familiar and friendly, turns out, not so much.
In order to be used in Houdini, the textures needed to be rebuilt in Karma from the ground up. The rigid file naming conventions helped make this process as efficient as possible. Textures then use the ‘context’ of their names to understand what part of the car they belong to.
Populating textures by individual geometry groups
Base variants
Texture 1/30!
a ringling homage
Chasing that rally-car aesthetic, I wanted to sticker bomb the car with sponsors. Who better than the professors 'sponsoring' my career? Everyone has an iconic quirk that is uniquely theirs, so I used my professor's and created logos for each of them in Adobe Illustrator.
To kick off the re-texturing process I brought the car into Adobe Substance painter. This allowed me to create selections in 3D space to easily modify the 2D unwrapped texture of the car in Photoshop. The other major benefit is that I could live preview the changes to the 3D model.
After creating the stickers in illustrator. The live preview allowed me to tweak the sticker placement in Substance as I applied the stickers to the texture in Photoshop.
// Hero Texture
THE RIG
drive it like you stole it
In the true fashion of starting a new software, I didn't do anything familiar or safe. Houdini recently released a new car rig, and who would I be if I ignored that for my car-centric project.
Step one: Give it some wheels
The car rig accurately simulates the physics, but requires the model to be rigged. With this tool, I only had to rig the tires and how they connect to the car, then Houdini simulated the rest of the car.
Step two: Remember how to drive a car
Animating here felt a bit unnatural at first as it isn't like 'traditionally' animating in C4D. Instead of key framing the position of the car, you drive the car. You tell the sim when to press the gas, push the brakes, and when to turn the wheel.
Step three: Drive it like you stole it
First, watch five videos on how to drift a car. Second, put your hands out in front of you and imagine steering a car. Then use that imaginary scenario to drive the car's parameters and keep iterating until you get a dramatic looking drift.
Sims are all about trial and error
Car drivetrain for the rig
Fully rigged and controlled
I am a great driver I promise
// Animation Pass
WORLDBUILDING
and then I started blastin'
Using the USD variant system from earlier, I created a single file that contained multiple types of trees. I set up a quick scatter node that took those variants and scattered them randomly across the ground. To avoid crashing and burning, a 'track' for the car had to be carved out of the trees.
In comes the coolest thing I have used in Houdini so far: The blast node. It's simple at its core, but powerful in application, it can alter points or 3D geometry from anything. Have a sim that took 5 hours to cache and render but there are a few particles blocking your view? Blast those particles away! No need to re-render the entire shot.
Multiple trees, one USD file
Removing trees using Blast node
THE MUD SIM
playing in the mud
Inspired by Rallycross motorsports, I knew early I wanted to drown the car in mud. Using an MPM solver in Houdini and mud sim tools provided by Christian, I wouldn't be afraid to get a little dirty.
One of the most important things I have learned as a 3D artist is that it is important to be efficient and optimized.
Trudging into the mud sim, the first step towards optimization is to find the bounding areas of the entire animation. To do this, I visualized the full path the car drove. I can cut the paths overall shape into the ground, filling it with mud. The goal is to ensure there is only mud where the car is driving so there is no wasted overhead.
Christian, the technical artist, has come in to save the day again by providing the mud solver. This solver is the fluid sim that drives the mud and water spray. I come in as the art director essentially to modify the parameters that control the mud.
Once the textures were finished, I ran the mud sim to view the final product, then re-ran both the driving and mud sims to curate the best shot.
Multiple sim layers of Mud and Water
Extremely in depth mud and fluid solver
FIX IT IN POST
nuke for first timers
Keeping up with the trend of trying new things in this project, I rendered out my entire animation with several AOV passes baked in. These AOVs contain information invisible to the eye, but contain vital data like depth, geometry groups, and lighting information. Using these AOV passes in Nuke enabled me to alter and edit entire parts of the final render without needing to re-render.
There were two things I wanted to accomplish in Nuke with this project. First was to control depth in post, providing more flexibility than rendering it in engine. Second was to explore cryptomattes to add 'in-world' text that the car could drive through. Unfortunately due to the nature of the sim, my cryptomattes render corrupted, showcasing one of many quirks in software as dense as these.
Simple FX applied in Nuke
Depth pass focus range
Cryptomatte objects pass
Color grading and effets applied in Nuke
SO WHAT?
the takeaway
The Mudstang got me through the initial confusion that Houdini casts and opened my eyes to it. Being thrown into this mock studio and pipeline allowed the strengths of Houdini to really shine. I got to play multiple parts in the entire production pipeline and see how involved, yet versatile each step is. I started in the role of someone who processes all the incoming files and preps them to be used in-engine. Then the role of an animator, where I passed the animation along to VFX. As a VFX artist I built the sims and understood the faults in the animation the required a second pass.
Houdini is extremely involved and overwhelming, but the pieces really started to click after I got through the growing pains. It is extremely rewarding to see each pass of my project come together and build upon one another.